Logon Policy
NAVIGATION System > Server Management > Logon Policy
The Logon Policy page sets logon policies that apply to all VSA users. Logon policies prevent a brute force break-in to the system. By limiting the successive number of bad logon attempts and disabling rogue accounts for a set amount of time, you can prevent unauthorized access achieved by repeatedly entering random passwords.
NOTE See VSA Logon Policies for a summary of functions affecting user logons.
Specify the bad logon attempt policy
- Number of consecutive failed logon attempts allowed before disabling - Specify the number of consecutive bad logons a VSA user or Portal Access user is allowed before their account is disabled in the account field. The count is reset to zero after a successful logon.
- Length of time to disable account after max logon failures exceeded - Specify the amount of time, in hours or days, that the account is disabled in the field.
NOTE To activate the account manually before the lockout time elapses, another user must enable the account using the System >Users page.
- Minutes of inactivity before a user session expires - Specify the time period of user inactivity before the user is automatically logged out. Set the number of minutes of inactivity in the field.
NOTE The inactivity timeout applies to the VSA web interface and Live Connect application. It does not apply to Remote Control sessions.
- Prevent anyone from changing their logon name - Prevent anyone from changing their logon name.
- Do not show domain on logon page - Hide the Domain field on the logon page.
NOTE If left blank, the domain checkbox still does not show on the logon page until at least one domain logon exists. Domain logons can be added using Discovery > Domain Watch.
- Do not show remember me checkbox on logon -Hide the Remember my username on this computer checkbox on the logon page.
Specify password strength policy
- Applies to VSA-authenticated passwords only.
- Require password change every N days. Require password change cannot be more than 90 days.
- Enforce minimum password length. Enforce minimum password length cannot be less than 16 characters.
- Prohibit password reuse for N passwords.Prohibit password reuse must be 5 passwords or fewer.
- Passwords must contain: -
- Upper case characters (A-Z - Latin alphabet)
- Lower case characters (a-z - Latin alphabet)
- Numeric characters (0-9)
- Non-alphanumeric characters (!, $, #, %, etc.) - must be ASCII printable characters (extended characters are not supported).
IT Complete Single Sign-On Integration
VSA servers with release 9.5.11b (build 9.5.11.4396) or later have the option to integrate the VSA login process with IT Complete (Kaseya One) Single Sign-on, without requiring any VSA license update. In 9.5.16b (build 9.5.16.5619) the authentication and registration workflow was simplified. Follow these steps to register the VSA at organization level with a Kaseya One company account, and then associate individual VSA user accounts to their respective Kaseya One users.
Workflow Overview
- Master or System role VSA user enables IT Complete login for one or more VSA organizations by mapping them to KaseyaOne company.
- Each VSA user within a mapped organization enables IT Complete login for their own by associating with their KaseyaOne credentials They can do this from the VSA login page or their user menu.
Note: Their KaseyaOne user account must belong to the same company that their VSA organization is mapped to.
To map their own VSA organization to a KaseyaOne company, a Master or a System role VSA administrator must complete these steps:
- Log into the VSA as a Master or System role user.
- Navigate to System > Server Management > Logon Policy.
- Check Enable Log In with IT Complete. Click Update. A new window with a KaseyaOne login is displayed.
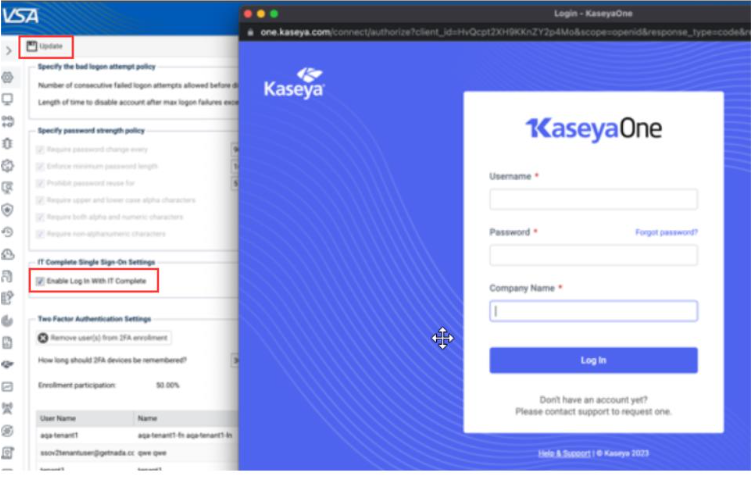
- Login to your KaseyaOne account. Once you authenticate with KaseyaOne, the organization mapping will be completed.
- Log out of your VSA account – VSA user accounts within the same organization as the Master/System user who completed these steps can now be associated with KaseyaOne accounts within the same company as the account in step 4.
To map another VSA organization a KaseyaOne company, a Master or System role VSA administrator must complete the following steps.
Note: Multiple VSA organizations can be mapped to the same or different KaseyaOne companies. If the same VSA administrator needs to map organizations to different KaseyaOne companies, they will need to provide different KaseyaOne credentials each time. In order to avoid credentials from a current login session being used, they should log out of KaseyaOne prior to performing this step.
- Log into VSA as a Master or System role user.
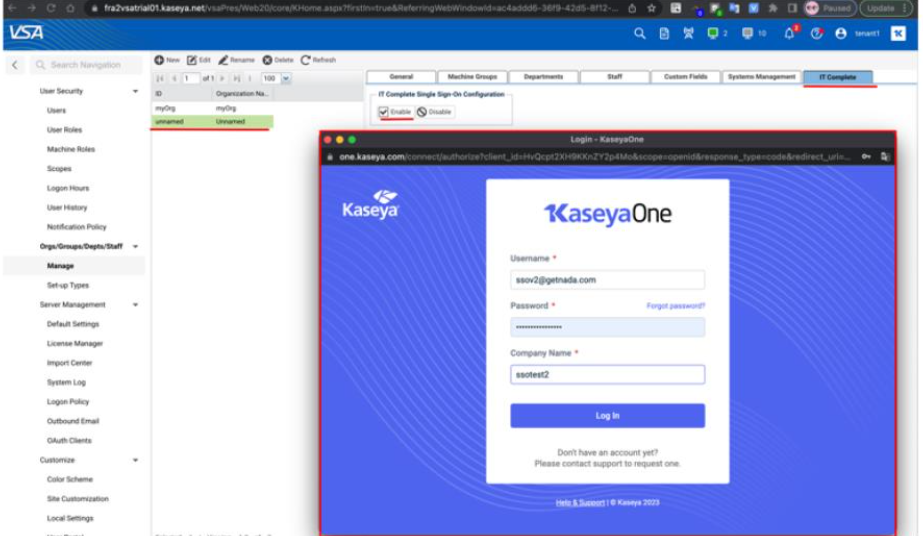
- Navigate to System > Orgs/Groups/Depts/Staff > Manage.
- Select the Organization from the list and navigate to the IT Complete tab.
- Click Enable. A new window KaseyaOne login page is displayed.
- Login to your KaseyaOne account. Once you authenticate with KaseyaOne, the organization mapping will be completed
- VSA user accounts within the selected organization can now be associated with KaseyaOne accounts within the same company as the account used in step 5.
To register VSA user accounts with Kaseya One accounts each user within the mapped organization(s) can use the VSA login page or their user menu to enable Login with IT Complete.
To register VSA user accounts with KaseyaOne accounts for the VSA Login page.
- Click Login with Kaseya One on the login page. This associates your VSA account with an IT Complete account.
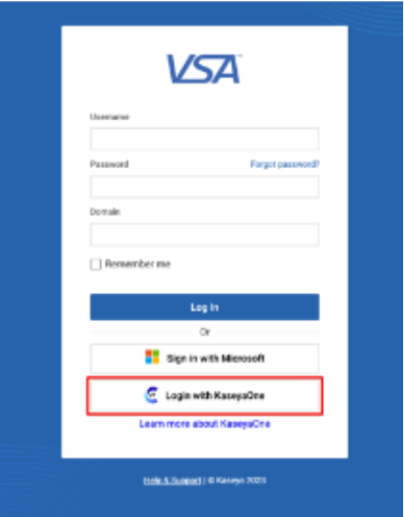
- Enter your KaseyaOne credentials. They must belong to the KaseyaOne company that is mapped to your VSA organization.
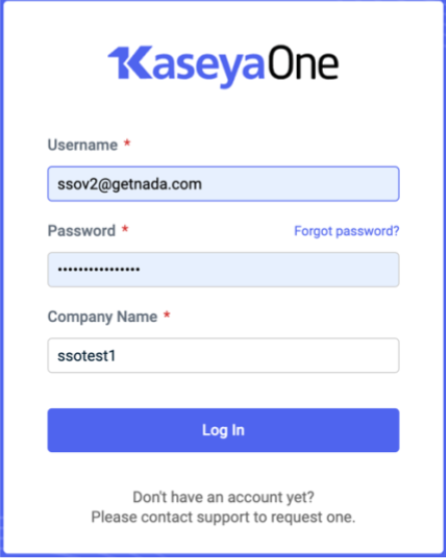
- Enter your VSA account credential.
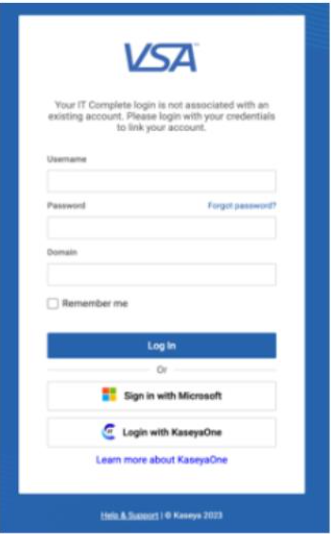
Now your VSA account is registered with your KaseyaOne account. You can log in to VSA using your KaseyaOne credentials
To register VSA user accounts with KaseyaOne accounts from the UserMenu :
- Click your VSA user logon name in the upper right-hand corner of the VSA to display your User menu.
- Click the Enable Log In With IT Complete option. A new window with KaseyaOne login page is displayed.
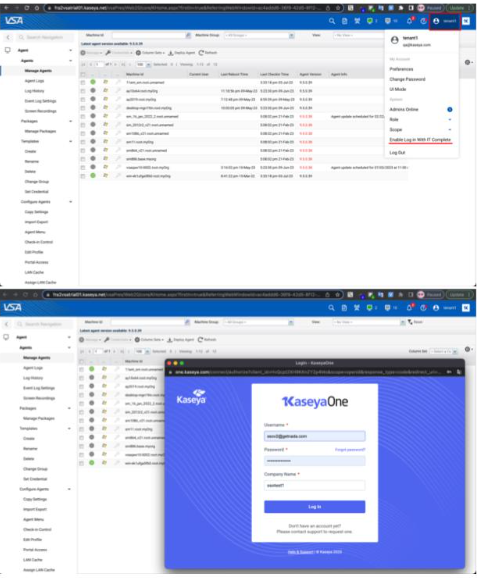
- Enter your KaseyaOne credentials . They must belong to the KaseyaOne company that is mapped to your VSA organization.
Now your VSA account is associated with your KaseyaOne account. You can now log in to your VSA using your KaseyaOne credentials.
To remove the association of your VSA account and KaseyaOne account:
- Click your VSA user logon name in the upper right-hand corner of the VSA to display your User menu.
- Click the Disable Log In With IT Complete option.
Now your VSA account and IT Complete are disassociated.
Two Factor Authentication Settings
By default, 2FA is set to optional for all VSA tenants. To add security to user accounts within a tenant, it is recommended that each tenant configures 2FA as a mandatory login process.
To enforce 2FA in VSA for all user within a tenant:
- Login to VSA with the corresponding permissions.
- Navigate to System > Server Management > Logon Policy page.
- Enable the All administrators are required to use 2FA checkbox.
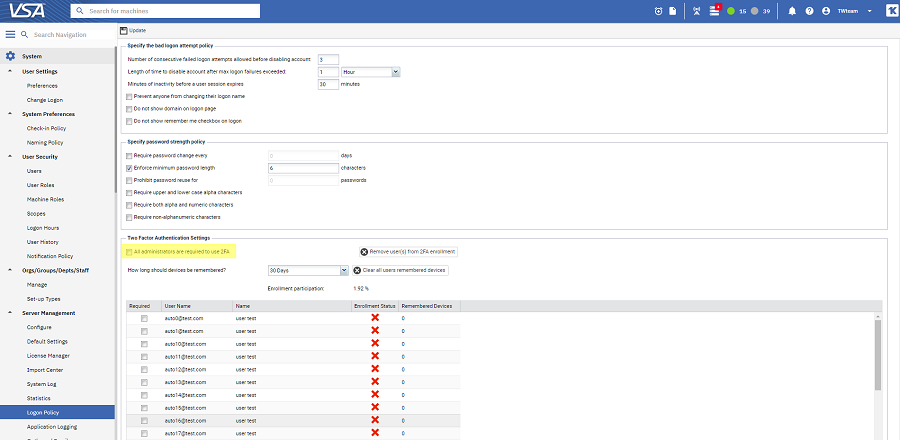
- Save the changes.
Now every user within the tenant will have to follow the 2FA process to login their VSA account.
To enforce 2FA in VSA for particular user(s) within a tenant:
- Login VSA app with the corresponding permissions (see above).
- Navigate to System > Server Management > Logon Policy page.
- Select the users within a tenant that you would like to oblige to follow the 2FA process.
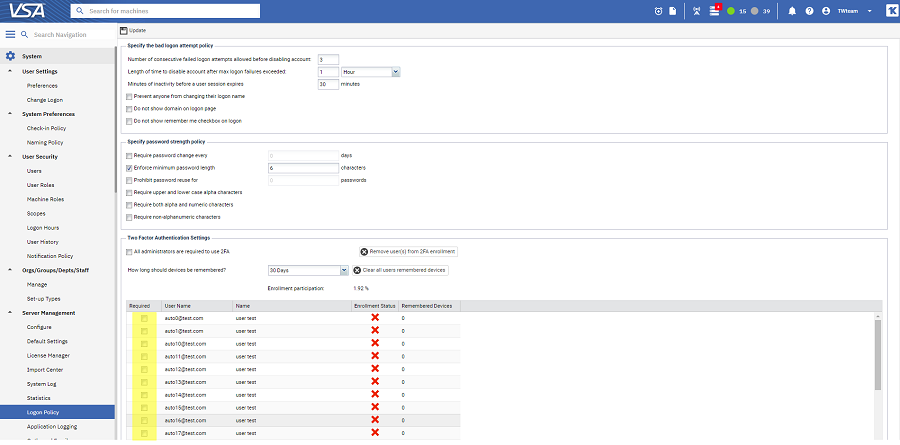
- Save the changes.
NOTE If you do not have the checkboxes to select particular users, please make sure you have the All administrators are required to use 2FA checkbox unselected.
Now the selected user within the tenant will have to follow the 2FA process to login their VSA account.
2-Factor Authentication Enrollment Process Monitoring
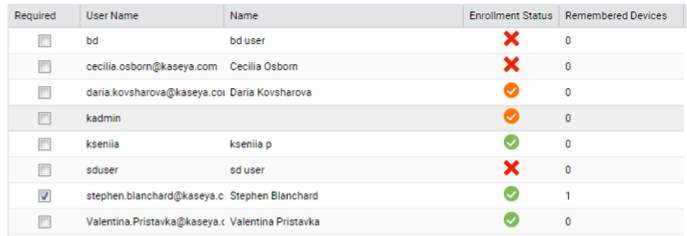
VSA Users with the corresponding permissions can monitor the status of 2FA enrollment process by Enrollment Status per each user within a tenant.
Currently, there are three 2FA Enrollment Status available:
 - user is not enrolled in VSA 2FA.
 - user is successfully enrolled in VSA 2FA.
 - user is partially enrolled in VSA 2FA. It means that user has not completed the 2FA enrollment process by entering the TOTP for some reason. These users will have to complete the 2FA enrollment process upon next log in.
To monitor 2FA Enrollment Status of each user:
- Login VSA app with the corresponding permissions.
- Navigate to System > Server Management > Logon Policy page.
2FA Rest Options
VSA Users with the corresponding permissions can reset the 2FA enrollment status for each user within a tenant in any 2FA Enrollment phase. This is helpful, for example, if users have completed the 2FA enrollment process, but for some reason they cannot log into VSA successfully.
There are 2 ways for a Master or System Role User to modify a user's 2FA enrollment:
- By removing 2FA Remembered Devices for all users within a tenant.
- By unenrolling a particular user or multiple users. This will also remove the user’s remembered devices.
NOTE Removing user's devices will not unenroll the User from 2FA. The user will have to enter a one-time password.
To remove 2FA Remembered Devices for all users
- Log into VSA with the corresponding permissions.
- Navigate to System > Server Management > Logon Policy page.
- Click the Clear all users remembered devices button.
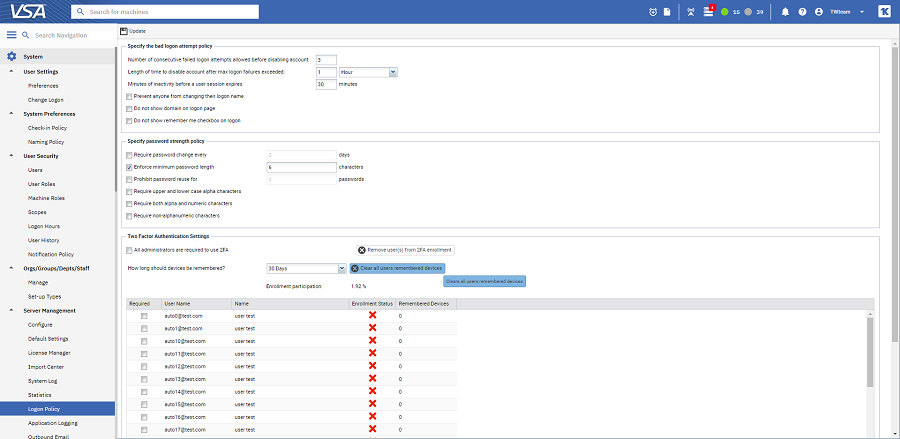
NOTE The 2FA Enrollment Status for all users within a tenant will stay unchanged after clicking the Clear all users remembered devices button.
To unenroll a particular user or multiple users
- Log into VSA with the corresponding permissions.
- Navigate to System > Server Management > Logon Policy page.
- Click the Remove user(s) from 2FA Enrollment button.
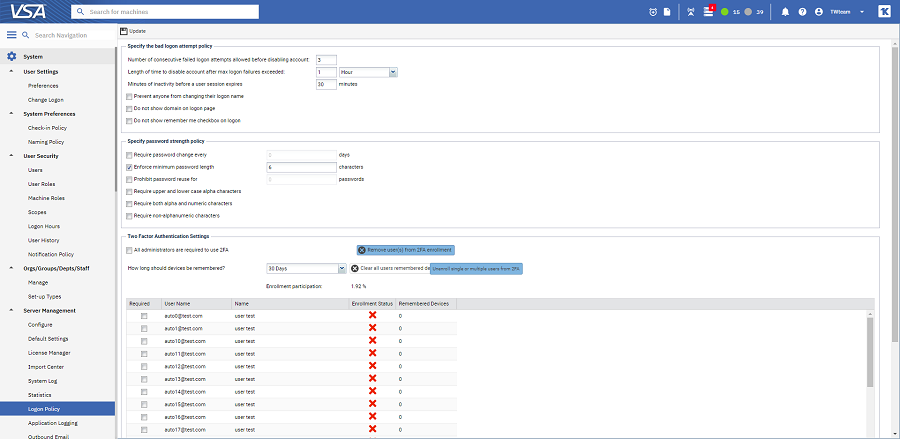
- Select user(s) you would like to reset 2FA enrollment for.
- Receive unenrollment confirmation for the select user(s).
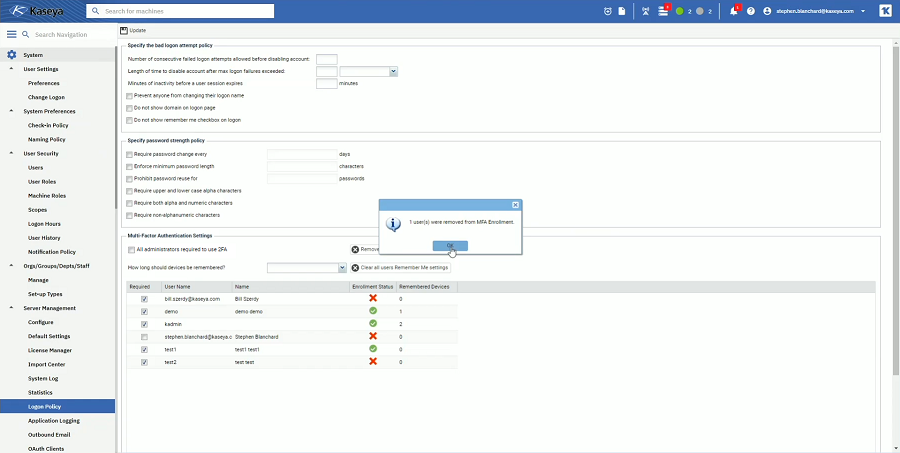
NOTE Users removed from the 2FA Enrollment will have to complete the 2FA enrollment process next time they log into the VSA.
NOTE See Two-Factor Authentication topic to set up authenticator application.
Update
Press Update to apply the settings.
