IT Glue Integration
Requirements
- Manager or Administrator user account on IT Glue.
- Master or System user account created on the VSA server for IT Glue only.
- Kaseya VSA master user account without any active filters and views.
- Kaseya VSA hosted with a valid SSL certificate.
- VSA API Web Service enabled on Kaseya VSA in System > Server Management > Configure.
- Automatically redirect to https at logon page enabled on Kaseya VSA in System > Server Management > Configure.
NOTE If you are managing a multi-tenant VSA server and want to enable the integration for a specific tenant, ensure to create an e-mail account using that tenant’s specific domain (i.e., itglue@mymsp.org).
IMPORTANT If planning to use a PSA, it is strongly recommend that the VSA is first synced to the PSA and the PSA to IT Glue to ensure accurate configuration matching.
NOTE To use the integration successfully, the VSA users with non-master and non-system user roles must have the System > Storage > IT Glue access rights added.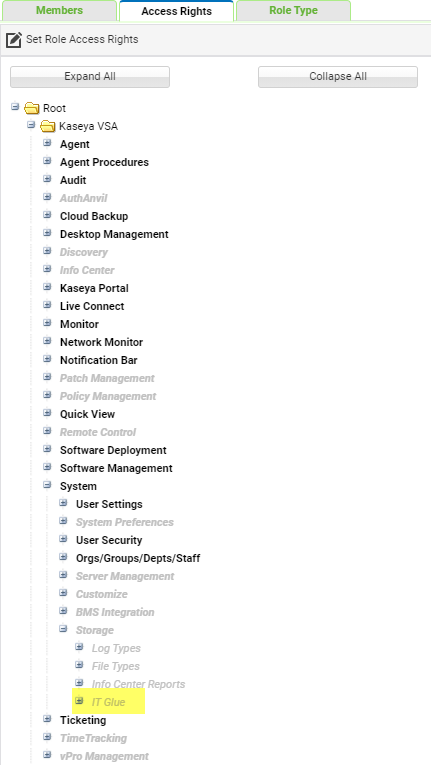
Linking IT Glue to Kaseya VSA
- Log onto your IT Glue account.
- Navigate to Account > Integrations.
- Under RMM Tools, select Kaseya. If you already have existing integrations, click on the New button on the upper right corner.
- Enter your VSA server URL (i.e., vsa.msp.org) and master user account credentials and click on Connect.
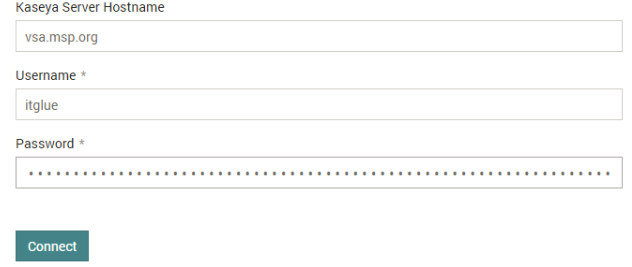
Figure 1: It is not required to fill in the protocol identifier (i.e., https://) for the VSA URL. In this example, we’re using itglue as the master user account. - Once credentials are authenticated, choose your preferred matching option, check mark Enable access from Kaseya, and click on Save and continue.
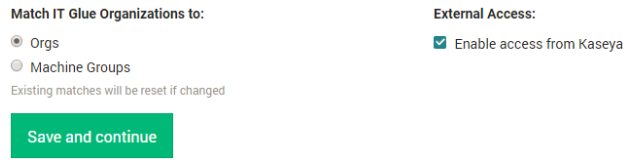
Figure 2: Ensure that you enable External Access for Kaseya. - You will arrive on the Active Integrations page where syncing will occur automatically. If desired, you can run it manually by clicking on Actions > Start Manual Sync.
- After syncing, if there are any unmatched items, proceed to match them by clicking on Actions > Matching.
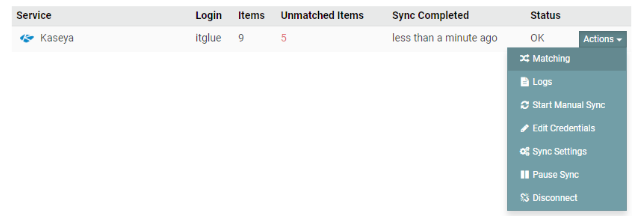
Figure 3: Since unmatched items were found, proceed to match them. - Proceed to match the organizations or machine groups by clicking on Actions > Create Organization.
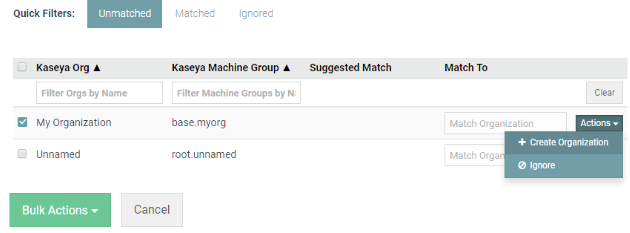
Figure 4: You can match multiple organizations and machine groups at once by clicking on Bulk Actions. - Click on the Matched tab and proceed to match any agents found.
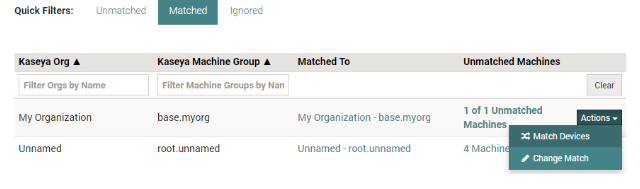
Figure 5: This is the final step of the matching process between VSA endpoints to IT Glue configurations. - Verify from the VSA that the integration is enabled by logging on your VSA master user account and going to System > Customize > IT Glue. Enable integration with IT Glue should be check marked and the URL of the IT Glue server automatically filled in.
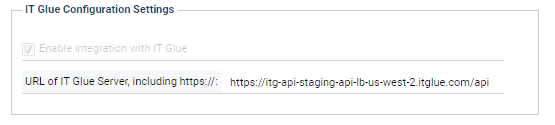
Figure 6: The integration is enabled here and the URL is automatically filled in from step 4 where credentials were filled in.
NOTE If your VSA requires a port for external access, add the port to the URL (i.e., vsa.msp.org:5721).
Using IT Glue in Live Connect
From the VSA or Live Connect, start a session with an agent. From the VSA, there are a two ways to do this:
- CTRL + left-click on the agent status icon to launch a session with the specific agent.
- Hover the mouse cursor over the agent status icon. This will display the Quick View. Click on the Live Connect button. This will launch a session with the specific agent.
Alternatively, in Quick View, click on the IT Glue button. This will launch a session and automatically draw out the IT Glue interface.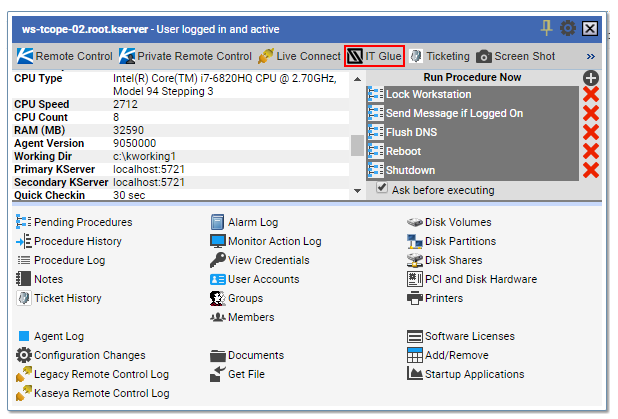
Figure 7: Clicking on the IT Glue button will skip step two and automatically draw out the IT Glue interface for an agent
Click on the IT Glue logo in the upper right corner.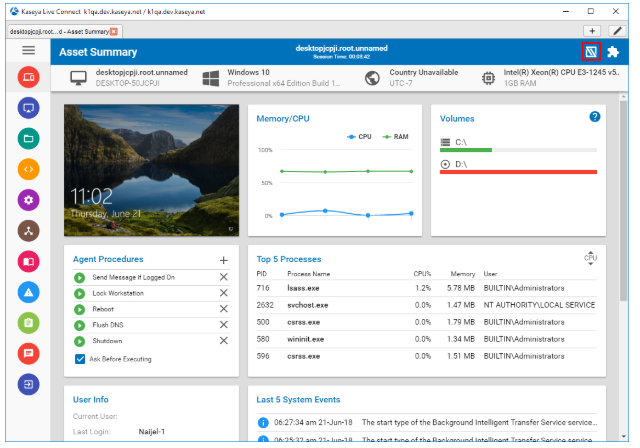
Figure 8: Highlighted in red, the IT Glue icon will draw out the IT Glue interface.
First time sessions will prompt in your default web browser to authorize the VSA to authenticate with IT Glue. Click on Authorize to proceed and return to Live Connect.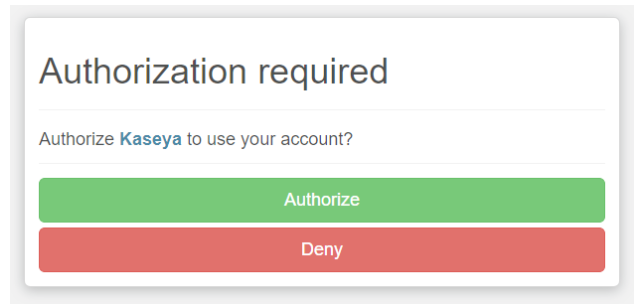
Figure 9: Click on Authorize to allow the VSA to authenticate with IT Glue.
You will see the following information available to you:
- Attachments
- Passwords
- Related Items
- Recent Versions
- Notes
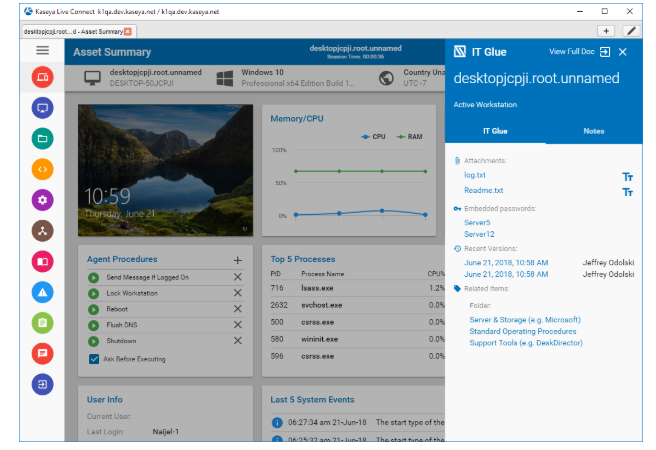
Figure 10: Attachments, passwords, recent versions, and related items are displayed.
NOTE Clicking on the hyperlinks to view attachments, passwords, versions, and related items will launch the IT Glue portal in your default web browser. If you do not have an active IT Glue session, you will be asked to log in.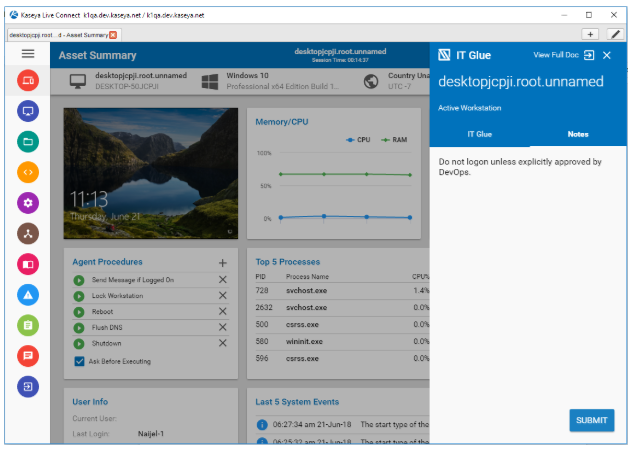
Figure 11: Under the Notes tab, the notes field is editable and can be saved by clicking on the Submit button.
NOTE If no data is available to be shown, either the agent had not been matched to IT Glue or the configuration had not been set up with the relevant information.
IMPORTANT At this time, IT Glue does not support updating notes via Live Connect if a PSA and IT Glue integration is active.
Figure 12: At this time, if a PSA is also integrated, you will only be able to view notes.
To get more information on the agent, clicking on View Full Doc will launch your default browser to the IT Glue portal where you will see all information associated with the agent. If you do not have an active IT Glue session, you will be asked to log in.


