Edit Profile
NAVIGATION Agent > Configure Agents > Edit Profile
The Edit Profile page maintains contact information, the language preference for the agent menu on the user's machine and notes about each machine ID/group ID account. Profile information can be maintained in three other places:
- The contact information in the Edit Profile page can be automatically populated when a new account is created using the Agent > Create page.
- VSA users and machine users can both maintain contact information using the Home > Change Profile tab in the Live Connect (Classic) or Portal Access (Classics) window.
- VSA users only can maintain notes and contact information using the Agent Settings tab of the Live Connect (Classic) and Machine Summary pages.
To change user accounts settings:
- Select a machine ID in the paging area.
- Enter Notes, Admin Email, Contact Name, Contact Email and Contact Phone information.
- Press Update.
Special Instructions
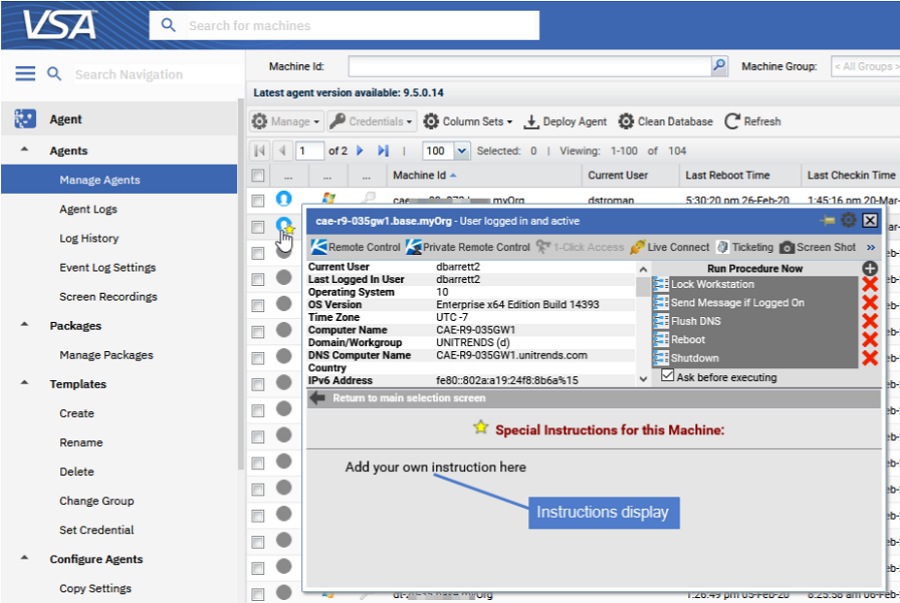
Enter any notes about a machine ID account. Helpful information can include the machine's location, the type of machine, the company, or any other identifying information about the managed machine. These special instructions display when you hover the cursor over an agent status icon with a badge. The Quick View window displays the Special Instructions text in the bottom of the window.
Icon Badge
Add badges to the lower right corner of agent status icons, such as  . These badges display everywhere the agent icon displays in the user interface. For example, you could mark a machine with a
  badge to indicate the customer requires a phone call before anyone works on that machine. Or mark a server with a
  badge because you should not do anything to it until after hours.
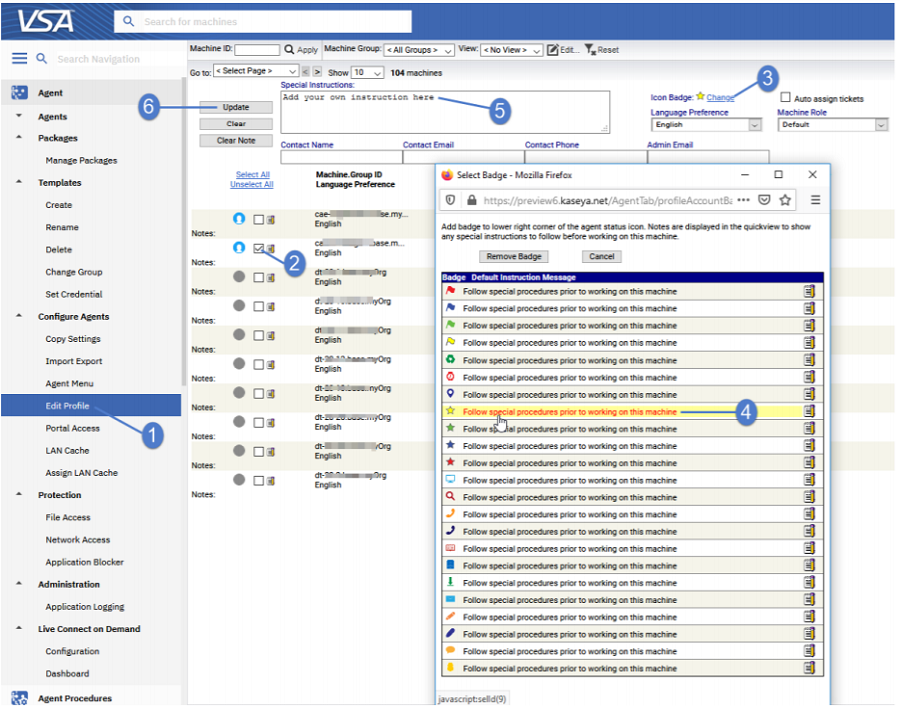
To add an agent badge
- Select one or more machines on the Agent > Configure Agents > Edit Profile page.
- Click the Icon Badge link at the top of the page and select one of the available badges.
- Add a special instructions text message for each the badge.
- Click the Update button to assign the badge to selected machines.

The badge is added to the selected machines:
When you hover the cursor over an agent status icon with a badge, the Quick View window displays the special instructions text in the bottom of the window:
Auto assign tickets
Auto assign a ticket to this machine ID if the Ticketingemail reader or a Service Desk email reader receives an email from the same email address as the Contact Email field of Edit Profile. Applies when new emails come into the Ticketing email reader that do not map into any of the email mappings or as described for Service Desk in the Ticket Associations section of the Readers tab topic in online help.
NOTE if multiple machine IDs have the same Contact Email value, then only one machine ID can have this checkbox checked.
Contact Name
Enter the name of the individual using the managed machine. This setting is displayed in the Contact Name column.
Contact Email
Enter the email address of the individual using the managed machine. This setting is displayed in the Contact Email column.
Contact Phone
Enter the phone number of the individual using the managed machine. This setting is displayed in the Contact Phone column.
Admin Email
Enter the email address providing administrator support for this managed machine.This setting is displayed in the Admin Email column.
Language Preference
The language selected in the Language Preference drop-down list determines the language displayed by an agent menu on a managed machine. The languages available are determined by the language packages installed using System > Preferences.
Machine Role
The machine role to apply to selected machine IDs. Machine roles determine the Portal Access (Classic) functions available to the machine user.
Actions
- Update - Click Update to update selected machine IDs with the profile information previously entered.
Select All/Unselect All
Click the Select All link to check all rows on the page. Click the Unselect All link to uncheck all rows on the page.
Check-in status
These icons indicate the agent check-in status of each managed machine. Hovering the cursor over a check-in icon displays the agent Quick View window.
 User Logged In and Agent is Active
 User Logged In and Agent is Inactive
 User Not Logged In and Agent is online
 User Not Logged In and Agent is Idle
Machine.Group ID
The list of Machine.Group IDs displayed is based on the Machine ID / Group ID filter and the machine groups the user is authorized to see using System > User Security > Scopes.


